
 |
| Lee Repairs Sewing Machines |
The sewing machine repair shop on 26th Street is closed although it is mid-day. The door is locked. Flyers for sewing machines printed on black and white copy paper are taped haphazardly to the dusty glass door. The interior is dark. It hadn't crossed my mind it could be closed! I've come to request a part for a machine.
Had received an e-mail: Do you want a "broken" "beautiful old sewing machine?" This turned out to be an early electric model manufactured by Singer. The machine, surprisingly heavy for its size, was oily and covered in a viscous layer of dust. The bobbin thread, waxy and brittle, broke into fragments as it was removed. There were consecutive layers of thread--yellowed white wound over blue, then black thread. [I've done that when bobbins were limited.]
Plugged in the machine. The light worked! Pushed the pedal. The bobbin rocked, the needle moved up and down. Was the machine broken? Wound the bobbin with fresh thread. Threaded the machine. Placed the bobbin in the holder and fitted it into place under the throat plate. Noticed a blunt edge on one arm of the metal bobbin shuttle where typically it would taper to a point. Hum.
On a sewing machine the intersection of the upper thread and lower thread create a stitch. Turned the hand wheel to join the threads. Here was the snag--the threads didn't intersect. Disassembled the bobbin housing, (which provided an opportunity to remove tumbleweeds of dense dark oily lint). The bobbin shuttle was decidedly broken.
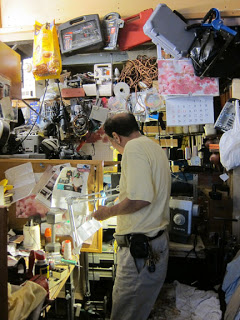
A few moments after discovering the repair shop door locked, hear the distinct clicking of a deadbolt shifting position. The door opens and Mr. Han appears, beaming. His repair shop is stacked from floor to ceiling with sewing machines and their components. It has the feel of a mechanic’s garage--dark, oily and full of possibility. The very small space is made even more so by the number of items on shelves, in open drawers, on the floor. There are sewing machines everywhere. And by everywhere I mean...
Had received an e-mail: Do you want a "broken" "beautiful old sewing machine?" This turned out to be an early electric model manufactured by Singer. The machine, surprisingly heavy for its size, was oily and covered in a viscous layer of dust. The bobbin thread, waxy and brittle, broke into fragments as it was removed. There were consecutive layers of thread--yellowed white wound over blue, then black thread. [I've done that when bobbins were limited.]
Plugged in the machine. The light worked! Pushed the pedal. The bobbin rocked, the needle moved up and down. Was the machine broken? Wound the bobbin with fresh thread. Threaded the machine. Placed the bobbin in the holder and fitted it into place under the throat plate. Noticed a blunt edge on one arm of the metal bobbin shuttle where typically it would taper to a point. Hum.
On a sewing machine the intersection of the upper thread and lower thread create a stitch. Turned the hand wheel to join the threads. Here was the snag--the threads didn't intersect. Disassembled the bobbin housing, (which provided an opportunity to remove tumbleweeds of dense dark oily lint). The bobbin shuttle was decidedly broken.
A few moments after discovering the repair shop door locked, hear the distinct clicking of a deadbolt shifting position. The door opens and Mr. Han appears, beaming. His repair shop is stacked from floor to ceiling with sewing machines and their components. It has the feel of a mechanic’s garage--dark, oily and full of possibility. The very small space is made even more so by the number of items on shelves, in open drawers, on the floor. There are sewing machines everywhere. And by everywhere I mean...

Update: Go back to Mr. Han's. The bobbin shuttle he's found is made of a lighter metal alloy than the original bobbin, however, otherwise it is almost identical. Am rather frustrated that Mr. Han calls me "beautiful lady" while asking too much for the part. Prefer professional interaction and a fair price, thank you very much.
More to follow.


